分享photoshop给照片加晕影的基础操作。


对刚学习photoshop的小伙伴而言,给照片加晕影的还有点难度,所以下面打字教程网小编就带来关于photoshop给照片加晕影的操作内容。 photoshop给...
对刚学习photoshop的小伙伴而言,给照片加晕影的还有点难度,所以下面打字教程网小编就带来关于photoshop给照片加晕影的操作内容。
photoshop给照片加晕影的基础操作
方法一:
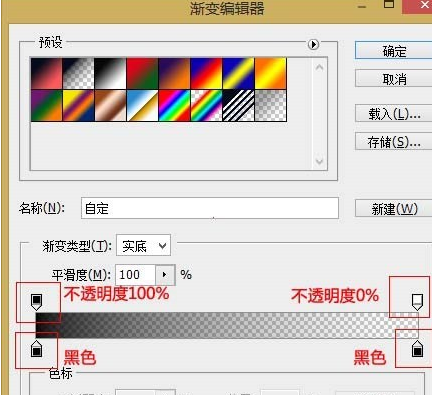
打开需要添加晕影的图片素材,并新建空白图层,选择渐变工具,设置渐变参数,渐变色都为都设为黑色,一边的黑色不透明度为100%,另一边为0%,并选择线性渐变。

在新图层中利用渐变工具在图片边缘多次拉出渐变,如果渐变方向方向不对,可尝试勾选工具栏中的反向。


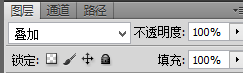
将新建的该图层的图层模式改为叠加,并调整图层不透明度,即可得到该效果。

方法二:
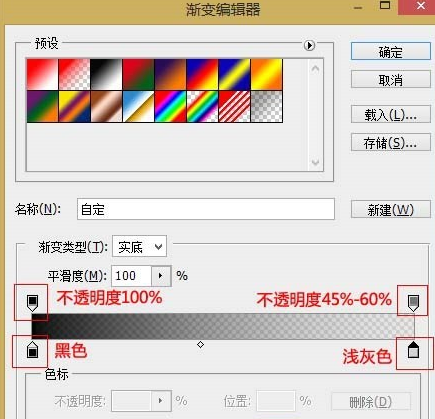
打开素材,新建图层,选择渐变工具设置渐变参数,渐变色一边设为黑色,另一边设为浅灰色,这里用的是(211,211,211),一边的黑色不透明度为100%,另一边的灰色不透明度50%左右,并选择径向渐变。
在新建图层上,以想要表现得重点为中心拉出径向渐变,并将该图层的图层模式改为柔光,即可得到效果。


各位小伙伴们,看完上面的精彩内容,都清楚photoshop给照片加晕影的基础操作了吧!
本文由cwhello于2024-10-11发表在打字教程,如有疑问,请联系我们。
本文链接:https://www.dzxmzl.com/6481.html
本文链接:https://www.dzxmzl.com/6481.html